
Okay, I know I've been gone for a bit & for that I apologize. We've had a bit of sadness hit our ohana recently & it has sidelined us all for a time.
However, I am here right now & will be attempting something brand spanking new (for me anyway). Yup folks, I actually am going to attempt to post a mini tutorial!
"Tutorial?" you say quizzically. Yes, I know it's confusing, seeing as how I barely know what I'm doing or how I'm going to do it 98.3% of the time, but I am gonna give it that old college try.
I here you laughing. I know, its funny to imagine me planning this out, because as some of you know, I generally forget to take the pics to include. We all love looking at pics when we try to follow tutorials & in the absence of video directions, pics are essential.
But I fooled you! I didn't think this one out! I just for some inexplicable reason started taking pics of this project when I started & managed to remember to take them with almost every step. Yay me!
Are you ready?
***Warning, this is an extremely long & rambly post.
Read more breaks have been provided for your sanity.***
What to do with a nasty old roasting pan
So many years ago, the Stork (aka my legal guardian, spouse, co-creator of my children) bought a roasting pan. He likes meat (minds out of the gutter please, you know who you are). He likes to cook meat; roast it, barbecue it, fry it, smoke it, you name it.
Anyway, he bought this gorgeous, giant, non-stick roasting pan. It was big enough to hold our Thanksgiving turkey, which has been known to get as large as twelve pounds! It was truly a sight to behold, Stork standing over steaming pan filled with beautifully brown & basted bird.
But after many years of use & more than a million washes, the pan began to die. When I say die, I mean the "non-stick" coating began to stick. And flake. And chip. And then it looked like this:
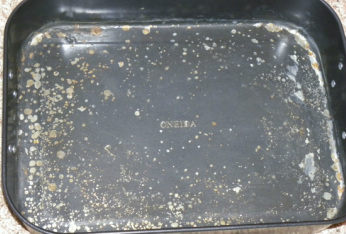
Reminds me of those speckled eggs you see around Easter. Not appetizing to eat food from it though.
Gross right? Makes you not want to use it, even with foil covering the entire thing. It got so disgusting, that the Stork would shed a tiny, manly tear every time he looked at it.
So sad, because it was still structurally sound. It wasn't like it had holes & was rotting to pieces. It just was not something we felt safe cooking with anymore. Can you blame us?
Then the Stork found a gorgeous, new, gigantic electric roaster & officially decided to kill off the old pan. But me, being me & not ever wanting to get rid of things I think still have some life in them, petitioned the governor (yes, by governor I mean the Stork) for a reprieve.
A pardon was granted & the pan came to rest in the Cave of Wonder. Where it sat, filled with shiny bits of potential (or what the Stork calls "junk") for more than a year.
I spent many hours trying to come up with what exactly to do with this thing I had come to affectionately (to myself) refer to as "Roasty". I was stuck, some quite awhile on the idea of repainting it & turning it into a hanging pot rack for my kitchen of limited cabinet space. But I moved on from that after realizing that the concept, while brilliant, would require too much involvement of the Stork.
I finally decided to turn it into a basket of sorts. Obviously it could not be a true basket, as it is not woven, but it could serve the same purpose. So the next step was to find fabric to cover it with, which did not take long once I put my mind to looking.
So my first step, once I got around to beginning, was to gather my supplies. A roll of cotton batting, such as the stuff used for quilting. The fabric of course, in this case a $3.00 baby blanket I found in the toilet paper aisle at the grocery store. TONS of hot glue, accompanied by my trusty hot glue gun of course. My beloved, though seldom used pinking shears. And of course, the desire to burn myself while attempting to make something ugly look pretty again.
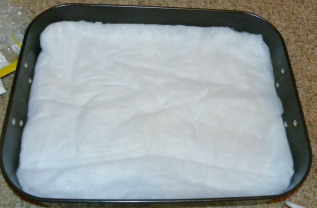
Second step was to cut my batting to fit the inside of the Roasty. Now I'm sure there is at least one person out there wondering why the batting. Its simple really, the batting makes the bottom look fluffier & anything containerish in my hale (house) has the potential to become a nesting place for the popoki (cats) that allow us to reside here with them.
So I cut the batting to fit inside Roasty & then hot glued it to the bottom.
See? Doesn't that look like a cozy little bed? You know you want to crawl in & curl up.
Next, I covered Roasty with my blanket. I guesstimated how much I would need to cut off to make it just cover the inside. Then I decided I didn't want to cut too much & that it'd be less complicated for me if I just covered the entire thing. With the exception of the bottom.
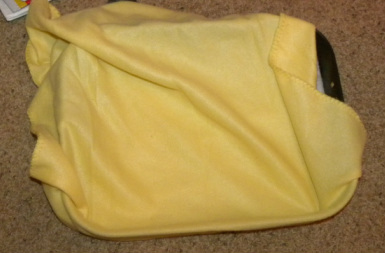
I picked yellow because I love the sunshininess.
This is where I tested the readiness of the hot glue & the heat conductivity of the metal, by burning my finger. Yup, hot glue on metal gets hotter. Just a little fyi for ya. ;)
Anyway, after pulling & folding, tucking & gluing, I declared myself done. Finally, after much time sitting with no purpose but to hold my shiny bits of potential, Roasty was reborn! (As a display bin for merchandise.)
Anyway, after pulling & folding, tucking & gluing, I declared myself done. Finally, after much time sitting with no purpose but to hold my shiny bits of potential, Roasty was reborn! (As a display bin for merchandise.)
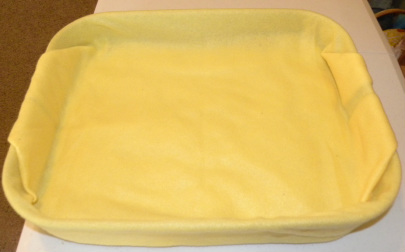 Roasty's new look! Pretty darn spiffy, if I do say so myself. | 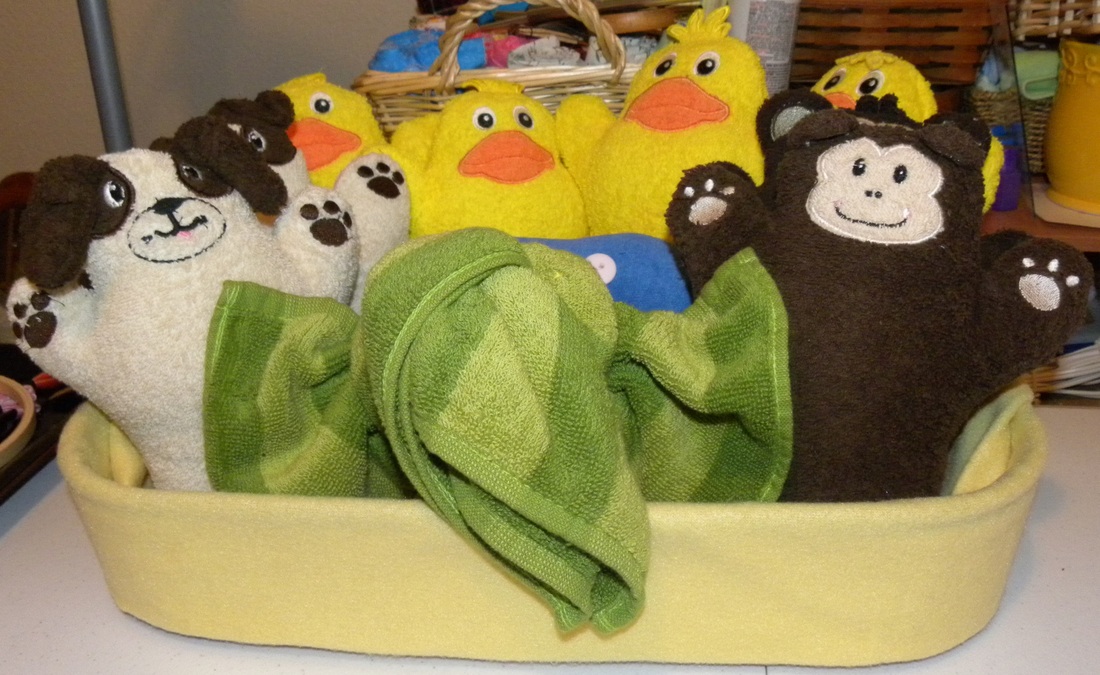 Roasty's full of loving friends now! |
So that's it, the closest I'll ever get to making a tutorial. I hope you enjoyed being mildly amused by my ramblings. I know I was. ;)
As always, I can't promise I'll be back soon, but I can promise I'll do my best. I know I've been neglectful, but I am trying really hard to remember something....
Until later my friends!
Aloha hugs,
`Clare
As always, I can't promise I'll be back soon, but I can promise I'll do my best. I know I've been neglectful, but I am trying really hard to remember something....
Until later my friends!
Aloha hugs,
`Clare

 RSS Feed
